June 13, 2011

VEG: Time to see what's up with the garlic

written by Yvonne

NOTE: We now have quite a following on TY VeggiePatch. Some followers are only interested in the bees while others are only interested in the garden. Henceforth, we will start the title of each post with either "BEES" or "VEG" to distinguish one type of post from the other so you can read only that to which you are interested

We spotted our first garlic scape. Our research shows that not all garlic produce scapes. We thought we had a non-scape producing kind until this one showed up.


Scape with dog.


Two farming friends said that once the garlic falls over, it's time to harvest. We weren't going to pull them up until July but decided to pull just the ones that have fallen.


First, I wanted to make sure there was actually a blub under ground so I dug away some dirt and....


sure enough, bulbs have formed!


The roots on the garlics were very long and very strong but we managed to get them out. Now the garlic will hang to dry for a while so we can use them later in the summer. The aroma was SO strong and wonderful, it gave me a hankering for some Italian food.


Now that it's full blown summer, we will be facing any number of garden pests. As we continued working on this week's harvest, we noticed something under the ginormous squash leaves. Good grief! What kind of pest is this? (Can you see it? It's the brown spot just to the right of center.)


Me thinks the pest is becoming clearer now.


OLIVE! Seriously folks, we did not put her here to try and win a photo contest. I was busy pulling garlic and Tom kept saying, "Oh my gosh! Look at Olive under the squah plants! Look Yvonne, she's so cute! Really, you gotta look, Yvonne! Yvonne, look seriously!"  I kinda blew him off thinking, 'Yeah, yeah, the dog is adorable but it's frickin' hot out here and I just want to get this harvest done and take a shower.'  He went to take her picture and I finally looked. Oh my gosh, she's so cute!!!!!


Here is the first harvest of Royal Burgundy beans. (This picture kinda makes them look like worms.) They are eggplant purple on the outside. But on the inside....


they are as green as green can be! AND what's even more interesting is that they turn 'regular' green-bean color when you cook them. FUN! We ate this batch with more potatoes we pulled from the garden.


Here is the beginnings of a cucumber. This year, I hope to be able to grow a decent amount. Everyone we know who gardens has cucumbers coming out of their ears but for some reason, bugs get to ours before I can get a good harvest.


These are the Barlotto beans. For this type of bean, you wait until the pod gets really big then pop out the bean inside. We knew they were a speckled variety but had no idea that the pod would be speckled as well.


And here are the beginnings of the red okra. Wonder if the insides will be green in the same way the Royal Burgundy beans were purple outside and green inside? Stay tuned to find out.


June 12, 2011

BEES: Success in June

written by Tom

NOTE: We now have quite a following on TY VeggiePatch. Some followers are only interested in the bees while others are only interested in the garden. Henceforth, we will start the title of each post with either "BEES" or "VEG" to distinguish one type of post from another so you can read only that to which you are interested. For bee-only posts, click the "bees" label in the upper right corner of the main page.

Festooning occurs when the bees hang together, each holding onto each other's legs thus forming a chain, on the outside of the hive to cool off. With the super hot weather we've been having lately, the bees are no exception in wanting to stay cool. I caught a bit of festooning one night around 9:00 p.m. It was fun to watch, as they were moving very slow and continuous.


On Saturday my mentor and friend Richard Flanagan came over to help me inspect and possibly add on to the hive. Last week Hernan and I saw a lot of capped brood. Throughout the week I noticed lots of little young bees around the entrance doing orientation flights. I was excited to see how they'd done in a week. It was great to have Richard over.


With the top and feeder removed, we gave them a couple puffs of cool smoke before we started. Not too much, just a little.


A top view for visual comparison's sake. You can see the frames that came with the nuc (the unmarked frames) have been fully drawn out. I was hopeful they'd done some good work on my Duracomb frames in the week since I'd seen them begin to build comb. They've eaten about a gallon and a half of syrup in the past week.


I was super excited to see this. The end frames were still empty, BUT in the upper right corner you can see that they've begun to draw out comb! It's in a little circular shape. And there were bees all over all of the frames, another good sign. There was only one end frame still waiting to be touched.


Here's another one of my Duracomb frames. HOORAY, success! One side fully drawn out with comb. We saw two frames that were empty on both sides last week each had one side fully drawn out this week. You can see capped honey on this one.


And another one of my frames with one side fully drawn, capped honey and eggs in the open cells in the middle. It was great to have my mentor who'd helped me build these frames, pull some out and see them being worked and filled by my first colony. What a great way to start a Saturday in June! There were more bees visible than last week, so a decent amount of hatching has taken place.


The queen was spotted on one of the older frames. She was very fast. I followed Hernan's advice and put that frame back in, and lifted out another. This one was super heavy with capped brood, bees and honey. Over all Richard and I saw very little pollen being stored. Hopefully they'll pick up steam in that regard and start to bring in their food from the neighborhood. I've seen pollen coming into the hive, but there is very little stored ... so far. Something to monitor in the following weeks.


Another one of my frames, fully drawn out on one side and eggs laid in the open cells. That's right, the queen has been busy laying eggs in the freshly drawn comb. I saw a single egg in each of these open cells, in the morning sun!


Richard said it was time to add the second brood box. Since I'm using a nine-frame configuration on the bottom I have to maintain nine frames for the top box to keep air flow and travel easy between the boxes. He showed me which frame to pull from the bottom; one filled with lots of capped brood and capped honey and a good amount of bees. We put that in the middle of the top box. On the bottom box we staggered the end frames with an adjacent frame to encourage them to draw that comb out as well. We put the empty frame we removed from the top box and put it in the middle of the bottom box. All frames got a spraying of thin syrup to encourage the girls to take to these frames. Previously, they left my Duracomb frames alone until I sprayed them with syrup. Whether that's coincidence or empirical evidence I don't know. But why mess with success? So all empty Duracomb frames get a misting of syrup, is my rule of thumb. Here, Richard holds up the last one for me to spray as we wrap up.


Richard uses my nine-frame spacer to get the ends of the top bars in correct position.


And now my hive has grown by another deep's worth. We saw one small hive beetle (SHB). Only one was spotted last week. So only two SHB's in two weeks is a sign of a very healthy hive. We also saw only a single wax moth this week. Fortunately it wasn't in the hive but between the top cover and inner screen cover. Another good sign. Richard and I poured another gallon of syrup into the top feeder, and let them get back to work.

June 8, 2011

The Latest and Greatest

written by Yvonne

Between vacations, comic conventions and other happenings, there's been a lag in news from the garden. So here's an updated. For the most part, ignore the dates stamped on the pictures as some are incorrect.

The carrots have done well. We pulled several and used them in salads. It was very satisfying to use homegrown carrots, but I have to say I wasn't too jazzed about their flavor. The few that we grew last year were much more flavorful. We probably left them in too long and now that the hot weather is here, they've lost some of their carrotiness.


We've grown one whole blackberry! The first year after planting, you really aren't supposed to get any berries at all so we were thrilled to see some growing at all.  And yes, we picked it off and each ate half.


Here are a couple of raspberries too.  We left them on the plant for another week.  Maybe this weekend we'll have enough for each us to each have a whole berry to ourselves.


This was a harvest of carrots, squash, kale, potatoes, the last of the snow peas, and some dill. The potatoes were really fun to dig up.  It was like a treasure hunt.  I made kale and potatos with sauted snow peas on the side for dinner last weekend.  It was a meal that came completely from our garden - how cool!  I dried the dill in our Ronco food dehydrator.  The house smelled SO good as it was drying.


Although we didn't get too much lettuce this spring, we had enough for three nice big salads. I harvested the last of it and made salads with snow peas and carrots for lunch. We'll use this spot for more herbs. Hopefully we're not to late to get more summer seeds in the ground.


We harvested the last of the snow peas on the vines then pulled up the plants to make room for okra.


Beans. Wow. They grow big and fast. I just love seeing these long Barlotto bean stalks reaching for the sky.


Here is one of the Barlotto bean flowers.


 And behold - a Barlotto bean!


Kale, beets and garlic all doing well.  As previously mentioned, we've started harvesting kale. This weekend we'll see if the beets are doing anything under the soil. If not, we'll rip those out to make room for something else.


Cauliflower grew big leafs, but no actual cauliflower so we pulled them out. So far, TYs VeggiePatch has still not managed to produce broccoli or cauliflower. We'll try again next season.


Squash is another story altogether. We made sure to sow only two squash plants this year and this is what we got.... they're still HUGE!  Next year, we're planting one plant and one plant only.


When you peak under the big leaves, you see tons of flowers and tons squash being formed (next two pictures).


And here is the money shot Tom has been waiting for. Look closely and you'll see a bee (he SWEARS it's one of his bees) inside the squash blossom doing it's job.


Peppers and tomatoes starting to make their presence know.


And here we have our Royal Burgundy string beans.  These are a bush variety versus the Barlottos which are pole beans.  See how they've chosen not to latch onto the stakes?


Here is our first Royal Burgundy beans! When you look at the plants, you can't really see them. But just as with the squash, when you move the leaves out of the way and look 'under the skirt', there they are.  One of my favorite meals is Phroney's green beans and potatoes. It's simple and delicious. This weekend we'll try her recipe with these Royal Burgundy beans and dig up some more potatoes.
Next week I'll take a picture of the inside of the beans - it's BRIGHT green!


Some friends came over to visit the garden and to take a look at the bee hive. Olive found an apple under the apple tree and played with all afternoon.


June 5, 2011

Bee Inspections 2 and 3

written by Tom

It was time for my second hive inspection. I work gloveless, as all the books told me, but I smoke my hands for an "invisible" glove approach.


There's always a loud buzzing until the cover's off and a hush falls over the hive. It's one of the things I love being a new beekeeper, or "beek". Here I was used a Boardman feeder, which is an inverted quart jar at the front of the hive. This Russian nuc (nucleus hive) that I'd bought had a miserable first week. It was unseasonably wet and cold. I was worried when they didn't touch the syrup for 4 days. Once they found the food, though, they started eating half a quart a day. Then a quart a day.


After 3 quarts in 4 days, it was time to put the 2-gallon top feeder in place. I gave 'em a little bit of smoke to drive them down a bit.


I removed the Imrie shim, some burr comb and the remnants of a pollen patty I'd given them. I made the patty far too big and put it upside down with the wax paper on top of the top bars. But in week two they not only drank 3 quarts of syrup but had eaten half of the huge patty I'd given them, regardless of how I put it down. The girls were amazingly gentle and quiet as I cleaned up their house.


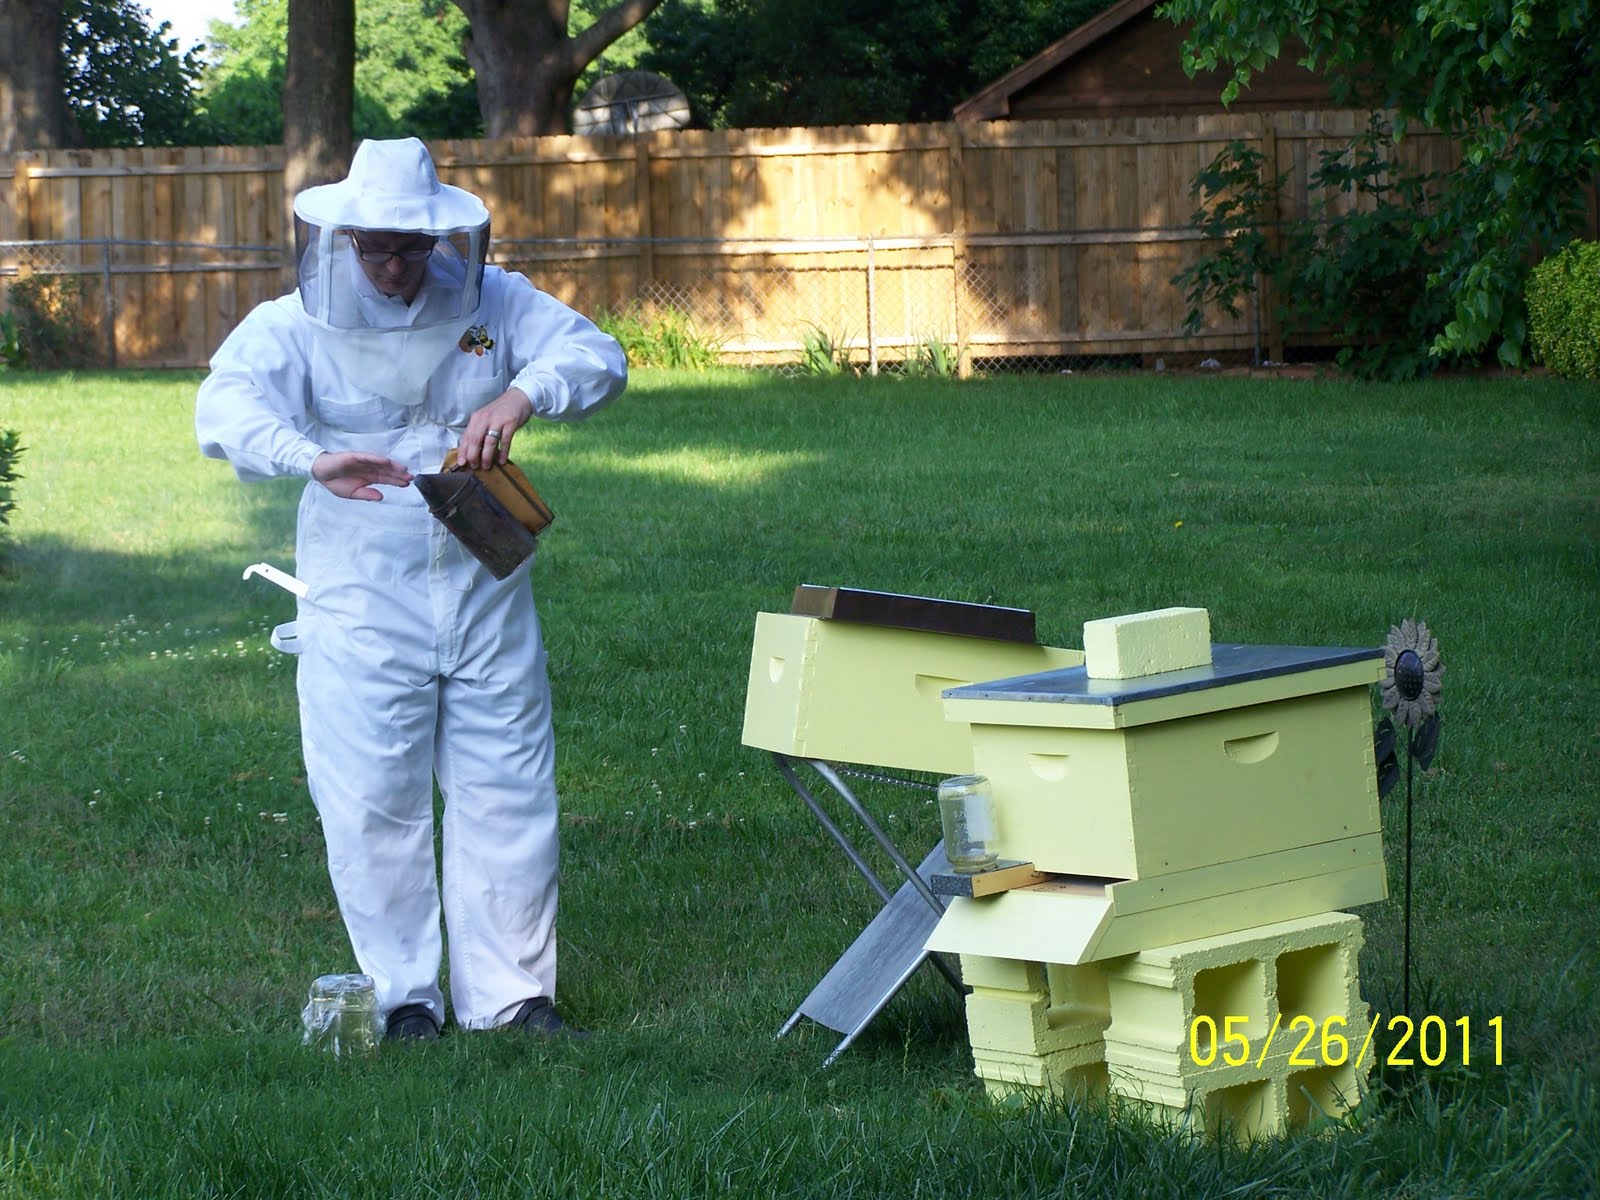
And the feeder goes on top jusssssst ... wait a minute. I'd better remove that Imrie shim before putting this down. Can you tell I've never done this before? A true beek at work.


Okay, shim removed, top feeder in place, and an empty brood box atop the feeder ensures a tight fit so robber bees from other hives won't get into all of this food. One of my teachers from the Mecklenburg Beekeepers Association's Bee School, Libby Mack, told me to always have extra equipment ready, such as a work box, even if you don't use it often. Because I had one ready to go, putting the top feeder in place was a snap. Then it was time for the syrup. I quickly learned I had far too much of an angle going on with my cinder block stand, as I could only put one gallon of syrup in this two-gallon feeder. Rookie mistake.


I gave them two-thirds of a gallon of thin syrup and removed the Boardman feeder. My mentor, Richard Flanagan, told me to install an entrance reducer to prevent robbing and help this young hive defend this massive food source in their hive. As soon as I put it in place there was an immediate traffic jam of bees coming and going. The ones coming in with pollen quickly learned they had to wait their turn and enter one at a time.

 
It was time to go on to the beach for Memorial Day vacation and hope the girls were okay. So far the bees had not touched any of my four frames with Duracomb foundation. It was a gamble because no one I talked to had ever used this foundation. But Richard told me part of the joy of beekeeping is in trying new things and sharing your experience. By the way, look at that beautiful continuous smoke I have going :)


So I returned to find the syrup completely gone. So I gave them another two-thirds gallon. Two days later it was gone, so I fed them another two-thirds gallon which they'd consumed in another three days. In one week they'd consumed two gallons of food. All in all, a very good sign they were building out comb. This Saturday my good friend Hernan, who introduced me to the Mecklenburg Beekeepers, came for an inspection. He and his lovely wife, Mercedes, took a tour of our garden while they were here.


When buying equipment I went with a hatless veil. It's not the greatest veil ever (the screen hits your nose if it's big like mine when you look up ... but you can wear a ball cap underneath it to prevent that), but it definitely is very cool in the hot summer sun. Also my new coveralls beesuit that Yvonne customized allows me to wear skimpy summer clothes underneath. I was pretty cool, all things considered in the 90+ -degree weather. After the garden tour, it was time for bees. Hernan took this photo of me as we began at 10:15 a.m.


The girls had built out a good amount of comb, including two sides of my Duracomb foundation. I could breathe a little easier knowing they were taking to my foundation of choice. There were still two frames untouched and two sides left open on other frames, so it will be a week or so before I add a second brood box. We spotted the queen and there were three frames completely packed with a dense pattern of capped brood. A fourth frame had a spotty pattern of capped brood but there were lots of brood. The feeding was having a great effect.

Another frame side had newly drawn, deep comb filled with nectar and LOTS of single eggs in the center. There was also some burr comb adjoining the tops of the frames but I left it in place 'cause it wasn't bothering me. Another longtime beekeeper Mr. Bill Bishop had told me that Russians like to build burr comb with oversized cells which they fill with water and fan to create air conditioning inside the hive. So my rule of thumb is that if it's not bothering me or causing a problem for my bees, leave it alone. Or, as Hernan told me yesterday, "Just leave them bee". 

Below I am using a nine-frame spacer to help me evenly arrange the frames back into place. I'm using nine frames in a 10-frame box to give the bees a little extra space, with the theory being that deeper comb will give me a healthier hive with better winter protection. We'll see how that goes. No gloves and no problems on my third gloveless experience. :) Olive was helping. With Hernan's guidance, we leveled off my hive stand so there was only a slight forward angle which allows me to fill the top feeder with two gallons.


I saw only one capped drone cell this inspection and no queen supercedure cells. AWESOME! All indications are that my bees are happy and have no intention of leaving. For the past week I've been watching my bees come in with a very light colored pollen which had a tinge of yellow. Hernan spotted the likely source. It was a tree in a neighbor's yard which is flowering right now.


There are a ton of blossoms and I think this is where they've been feeding lately. I think this is a sourwood tree, the only one I've seen in our neighborhood.


After the inspection, it was time to cool down and visit underneath our apple tree. Yvonne brought out some porch chairs for a Southern sit-down in the shade with some herbal iced tea.

 
This year it's all about enjoying the bees, helping them build a healthy hive and keeping them strong and happy. So far so good. :)