October 3, 2011

VEG: TY Gets Ready for a Fall Garden

written by Yvonne

I know, I know.  It's been a month since we've posted any happenings at TYs VeggiePatch. The reasons for this are as follows:
  1. One weekend we went to Asheville for a Yoga workshop and a little time away.
  2. One weekend we did dog stuff (hike, etc).
  3. We are each the head of a study group (Cartooning Club and Sutra Study Group) and we've had to spend time write lesson plans and studying for those meetings.
  4. Tom had bee stuff to attend to.
  5. I participated in an outdoor craft show.
  6. And lastly, there really hasn't been much to report.
It's the end of September and our tomatoes are just NOW getting ripe. Let me tell ya, we've been enjoying the heck out of them regardless of what month it is. We created a meal called Garden Pasta.  We take basil, tomatoes, peppers and garlic (all grown from the garden), cut them up, toss them with some fresh pasta and olive oil and that's dinner.

This will likely be the last batch of peppers for the season. There are still some on the vine but they're pretty small. We'll hang on to the plants as long as they produce fruit and until the cold gets 'em.


Now that the weather is cooling down, Tom has been working on his grill master skills. A few weekends ago he grilled a 15-lb turkey on the Weber charcoal grill (show below)! It was impressive. Tonight he's grilling two whole chickens and all the peppers.

He's gonna get them all blackend up (the peppers, not the chickens). We'll cover them with foil and wait for them to cool, then peel the blackend skin off and we'll have roasted peppers.This is the black skin we're looking for in a roasted pepper.


Last weekend we started a new batch of seeds. Here we have spinach and one variety of arugula...


and here we have another variety of arugula, cabbage and swiss chard. Some of each type of seed sprouted within four days of being planted!


We ordered three varieties of garlic to plant from The Garlic Store. We'll brake the bulbs apart, stick them in the ground, and forget about them until next July.  The garlic we harvest this summer has been fantastic.  It's now a staple for the garden and we'll never have to buy garlic from the store again!  (Mind you, there's nothing wrong with garlic bought from the store, it's just super cool that we can grow our own.)


Here are two varieties of lettuce we started in newspaper pots and they are doing great. It will only be a week or two before I can come to the backyard to clip off some leaves for a salad.  Can't wait!


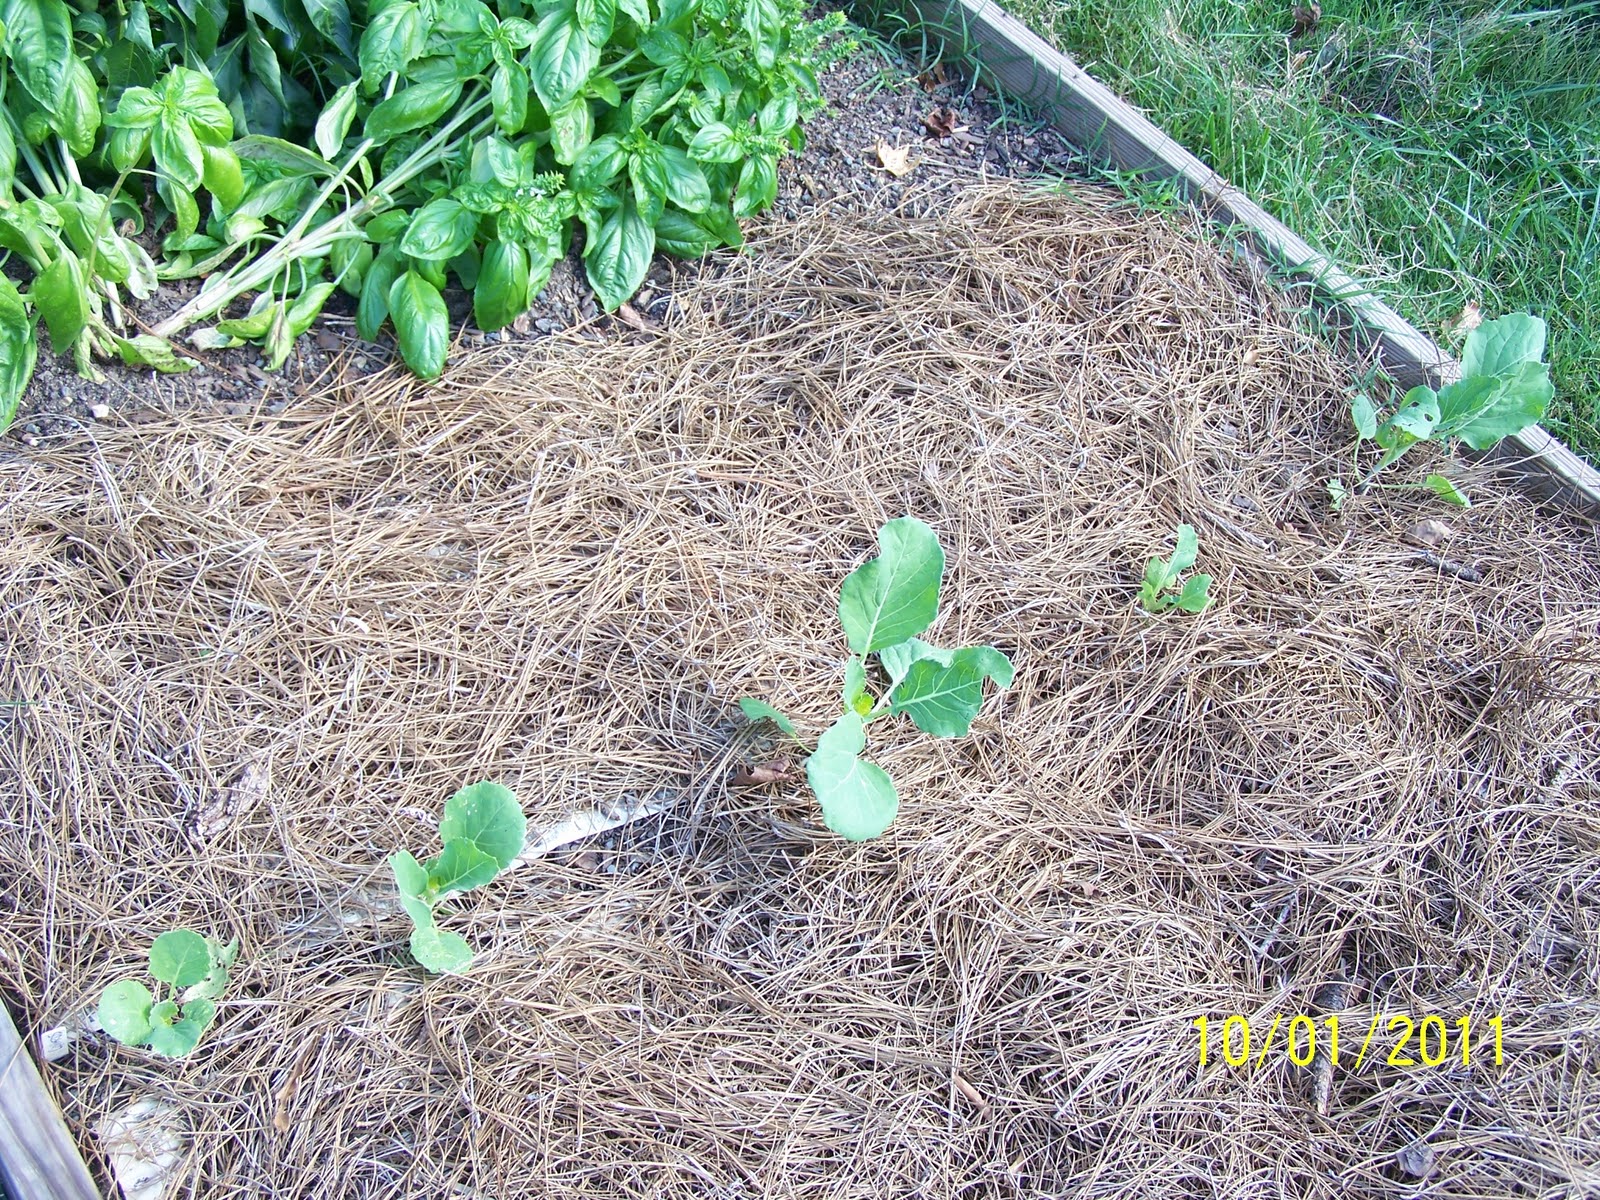
We weren't sure if the collards would take hold, but they did.


Many weeks ago I'd trimmed back the basil and discovered that our turnips actually had started growing. After they were exposed to the sun, they grew like crazy.  In fact they grew so fast, we didn't get a chance to thin them out.


As you can see, two have grown very close together but that's OK. They came up so quick I think we may have time to get more in the ground before the super cold weather hits - they don't do well when it's too cold.


Also growing under the shade of the basil was cilantro (left). It likely won't last through the cold months, but since we're going to use cover clothes and keep as much going as possible through winter, we'll see if it hangs on. One of my students gave me a cutting of oregano from her back yard.  I planted it in the bed several weeks ago (right) and it's taken hold as well.  Thanks Pam!


The broccoli is certainly taking over... but still no signs of flowers or anything that can be eaten.


We've completely ignored the sweet potatoes and they have really overtaken.  Hopefully that means something good is going on underground.


The berry bushes are growing like crazy up against the side fence. We haven't had any berries except for one or two in the spring just after they'd been planted. Hmmm... this makes me wonder if someone's been enjoying the berries before we could get to them.


It's obvious we can grow cabbage. We've never grown cabbage so this was supper exciting for us.


I'd been instructed by Tom to go to the butcher and buy bratwursts as well as some good, hearty buns because we were harvesting this cabbage to make a vinegar-based cole slaw to top the brats.  I did as I was instructed; bought brats and buns and made the only kind of cole slaw Tom has ever liked, using our first, very own, home grown cabbage. Tom was one happy camper. (I had my coleslaw on the side with a veggie burger.)


Guess this is why they call it a "head" of cabbage - it's as big as your head!


September 5, 2011

VEG: Summer garden comes to a close

written by Yvonne

Current vegetable happenings: We have three successful cabbages. There is definitely something chowing down on the large outer leaves but we're not going to do anything about it at the moment. If it/they starting eating too much, we'll have to spray a little Jerry Baker tobacco/soap/garlic repellent.


We "found" a volunteer lima plant hidden under some weeds in one of the boxes.  Since none of our lima seeds germinated, we'll leave this in and see what it produces.


These are turnips we planted several weeks ago. They were covered up by the basil. Now that the basil has been trimmed way back, these guys should get plenty of sun.


A teeny-tiny cilantro plant. Come on little guy, you can do it!


Since we've been clipping the top of this tomato plant, tons of tomatoes have come out. We're calling them our early fall tomatoes.


Broccoli plants are coming along.


It's obvious why these peppers are called "rainbow" peppers. Simply gorgeous!

It being Labor Day weekend and all, we needed to spend time laboring in the garden. Although we've been somewhat disappointed with our summer vegetable production this year, we learned a lot which will hopefully translate into a more productive fall garden.  I started by pulling out the old kale and marigolds, and significantly pruned back the basil.
Tom got another truck-full of dirt Friday so we could top off the beds this weekend. The dirt in all four beds has settled so they needed more. In addition to settling, there's a dirt wad around the root of every plant so when you pull something out, you loose a little dirt that way too.


We could see it coming a mile away. As soon as Olive saw the tailgate down, she wanted to get into the back of the truck. Once we got a good deal of the dirt out, we let her get in.  Needless to say, she got a bath at the end of the day.


The newspaper posts we used to plant seeds in some weeks ago held up GREAT! This is the a butternut squash in a newspaper pot.


With new dirt in place, we designated areas for the squash, lettuces, and collards.


Our day in the garden was done. Time to move the truck back to the carport as Olive gets her first ride in the back of the truck.


Saturday was canning day. We spent the better part of the day chopping, cooking, and canning - all of which was made SO MUCH EASIER now that the microwave above the cook top is gone. We were able to use all four burners and could put the canner on the back burner. Yesterday Tom labeled all of our wonderful work.


 We made blackberry jam, peach jam (which turned out MUCH better than last year's batch - apologies to anyone who got that as a gift last year), and pepper onion relish with our homegrown rainbow peppers.


August 29, 2011

VEG: Still a slow summer

written by Yvonne

This weekend we did some indoor projects so this will be a very brief garden update. Still lots of peppers coming in.


This is the lettuce, butternut squash, and cauliflower seeds we started a few weeks ago. They come up nicely, but the collards, limas and spinach did not. We need to do some repairs on the boxes, get some dirt, and more pine needles before we plant these guys in the ground. We'll do all that during the upcoming Labor Day weekend.


I did not want to post this picture because it looks like something out of a horror film. In actuality, it was our first yummy tomato of the year.  Tom insisted I post it.


August 22, 2011

BEES: Two Queens, Two Hives and a New Approach

written by Tom

So seven days had passed since Hernan and I had installed the two new Russian queens. After a nerve-wracking week of wondering whether or not they'd been released, it was time to take a look. (The squashed bee on top of the frame is one reason for general anxiety when working the hives. One false move and you can easily kill the queen.) Here you can see the queen cage in hive Boris. The candy end had been completely eaten through. A bee is seen cleaning out remnants. The queen had been released!

In Hive Natasha the queen cage had fallen from the frames. Fortunately it landed bottom-up, and the screened bottom board caught it, too. This candy end also had been eaten through, so that queen had been released. So far, so good. I worked the hives to clean them up a bit and remove the cages.

I put the cages at the entrance so that any bees inside could find their way back out. I'd read that in a book. However I quickly discovered that remnants of Her Majesty's pheromone was enough to set off a bit of robbing, as bees from Natasha quickly flew over to see what the good smells were about. The ones who did met their demise thanks to Boris' guards. For Hive Natasha I just blew any bees out of the cage. No more robbing.

This end frame had been drawn out on one side and filled with syrup honey. There were more bees than I'd remembered in Natasha. She seems to be doing well, regardless of my worries about only seeing a bee or two at a time at her entrance.

Hive Boris' numbers also seemed to have leveled off. This original hive had many more bees on it immediately after our requeening efforts a week prior. Now the two hives seemed closer in strength, more even, though Boris still has more bees.

In the following eight days I built and readied more frames. This time I used old-fashioned crimpwire with 100% beeswax. Bees love this stuff, and take to it in no time, is what they told us in Bee School. I had to make 14 of these total, to combine with my four frames of drawn comb I'd harvested and readied a few weeks prior, to make 18 frames (nine each for each hive addition).

In these past two weeks I've become convinced that one of the most important things we can do as beekeepers is, "First, do no harm." I always prepare a mental game-plan for my inspections. Now, I'm going to do only what's necessary to achieve that and nothing more. I'm also going to learn how to read a hive without even opening it. Minimizing risks and trusting the bees to do their jobs seems to be a perfect approach to me. Less is more. Hive Boris was looking good, even stronger than before and was moderately calm.

I found a good many bees and evidence that the new queen was laying, as capped brood was found. I quickly put things back in order and moved on to Hive Natasha.

A fair number of bees greeted me in the new hive, and her demeanor was calm.

One end frame totally capped with syrup honey. They are busy laying up stores for the winter. Only one side of this frame had been drawn and used, so I flipped it when I returned it to the hive to encourage them to work the other side.

And another honey frame. Both sides full and capped. Wow, these deep frames were H-E-A-V-Y! Each hive needs to store up about 60 pounds of honey for the winter.

And a third honey frame in Natasha. Where's the brood and eggs? Uh-oh. Was this hive queenless?

On the fifth frame I found what I came looking for: capped brood. I could hear the choir of angels singing. The new queen had laid these eggs. It had been 15 days since I'd requeened. In the life cycle of the honeybee, it takes 21 days for the worker bee to go from egg to larvae to pupae to emerged bee. In that time, it takes nine days to go from new uncapped egg to a capped larvae or "brood" on the comb. It had been 15 days since the split, so all brood on those frames we put in Natasha had hatched. Only new eggs would be capped brood. Both Boris and Natasha with their new queens had capped brood. Success!!!

Deeper into Natasha showed that her strength had greatly increased since she'd been started.

I took the four empty honey frames I'd spun out, and placed them in the center of Natasha's second box. This gives them a jump-start, as the queen can start laying right away in those frames. The sooner the better, so this new hive can get up to full strength before winter comes.

The still wet honey frames quickly attracted attention from below.

I also converted a beetle trap into an inside-the-hive pollen feeder. I removed every other rung on this trap with a Xacto blade. Natasha's bees immediately loved the fresh pollen gift I gave them.

I cleaned out both top feeders. I must say that the plastic two-gallon top feeder is wonderful. Hose it down to quickly clean. Any bees underneath it seem to not mind as I clean the top side. I love my plastic top feeders and so do the bees!

Fresh syrup was given to both hives and bees quickly climbed up to feed.

Boris is looking good. The numbers outside the hive have been growing.

As has little new hive Natasha. It's not a ton outside, but it's far more than the none or one bee I'd seen in the previous weeks. She's off to a great start!
I left both with gifts and a second story addition. Hopefully they'll immediately take to their new quarters, spin out the honeycomb on the pure wax foundation I'd given them and start to lay eggs and increase their numbers in time for winter. We'll see. So far, so good!