written by Yvonne
As you know, this blog is primarily all about the garden. But I thought I'd throw in a bonus home improvement post since we've been doing a lot of it lately. And one of the home improvement projects actually leads into the garden update.
We've lived with it long enough! Company is coming in a few weeks and it's time to get the job done. And that job would be installing 1/4 rounds to finish off the floors in the areas we ripped up carpet. Those areas are the main hallway, the master bedroom, the guest bedroom, and the library.
Thanks to our dear, dear friend Nolan (and man who has every tool imaginable) this job became a reality. He graciously took time out of his Sunday to bring over one of his chop saws for Tom to use.
After lessons on how to use the saw to ensure Tom still had 10 fingers attached when he was done...
Tom was off and running.
Nolan gave thorough instructions on how to measure each piece, which end of the wood to
cut first, and how to cope the corners so they look pretty and not just
hacked off. Coping all the corners took quite a bit of precision and time. Once the first pieces were cut, Tom used his brad nailer to secure the pieces in place.
Nolan also gave us an education in new workman fashion trends. He introduced us to the Longtail T (a.k.a. Crack Spackle) which solves the issue of 'plumber's butt'. This item, along with Ballroom Jeans and Buck Naked Underwear, can be found at the Duluth Trading Company (www.duluthtrading.com). Even Santa needs a Longtail T

The Duluth Trading Company has GREAT ads for their products. (Click below to see the video.)
Here's one for Buck Naked Underwear. (Click below to see the video.)
But I digress....
Our floors are finally finished! What a difference it makes. It was a two-weekend project but that's because other projects were intermixed along with this one. Here's a look at Tom's fantastic work.
Amid the 1/4 round project, we also had new blinds installed. The blinds that were here when we bought the house were 1", grayish, aluminum gross things. Getting them replaced is something we've both wanted to do very badly but we needed to save up some clams to buy them. So for 3 1/2 years we've learned to avert our eyes and not look at them. It was FINALLY time - we bought new blinds and had them installed. A few things we did on our own which saved quite a bit of money were:
- We pick up all the blinds from Lowe's and brought them back to the house,
- we took down all the old blinds, and
- we shortened the new blinds that were much too long.
The blinds were installed on Friday and we admired them all that night and part of Saturday. But every time I looked at the kitchen window (which was the area that actually prompted us to buy new blinds in the first place) I kept thinking it should look... I dunno, better, cleaner, more wow. I mean the blinds themselves look great, but I kept thinking the whole window area should look cleaner and brighter. Then it hit me. The trim around the window is a dull, chipped yellow! EEwww! No wonder it still looked grungy!
Here's what it looked like - you can see the white window and the ugly, chipped, yellow sill and trim.
It took having pretty, new white blinds for me to really see how yellow the trim was. So naturally ('cause I didn't have enough on my to-do list already) I broke out the trim paint and went to town.
Ahhhh - MUCH better! (Disregard the messy kitchen.)
Unfortunately I didn't take a good 'before' picture in the kitchen so to give you an idea, here's a before and after of a bathroom window which was similar. Before - old blinds, yellow trim...
vs. after - new white blinds and white trim.
After shortening the blinds (thank heaven this only needs to be done once) I commented to Tom, "It's too bad we can't do something with all these extra blind slats. I hate to throw them away. Can you think of something to do with them?" I fully expected his answer to be, "Can't think of anything right off the top of my head. Let's hang on to them; maybe we'll think of something later." But nooo. Mr. Johnny On The Spot says, "Let's use them as markers in the garden instead of those itty-bitt plastic ones which you can't see anyway." BRILLIANT!!!
One last little chore for the weekend; I sat down and wrote on our new plant markers. We have a TON of slats left over so we'll have plenty to use for every season.
One last little chore for the weekend; I sat down and wrote on our new plant markers. We have a TON of slats left over so we'll have plenty to use for every season.
(Is this right? It doesn't look right. Mesculin? Mesculum? Mesculum? Mesculun?)
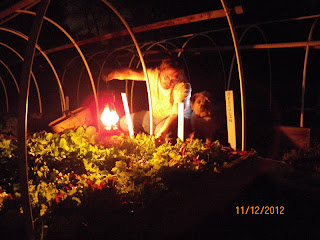
Finally, it's time for dinner. Although it looks like it was midnight, it was only 7:00. Tom made some yummy salmon patties out of salmon he grilled earlier in the week and then did a night harvest of lettuce for a dinner salad.
And of course, Olive was there to help.


1 comment:
Great post and great pics!
I can't wait to see the improvements.
Post a Comment